










Hanging one picture is easy. Hanging ten so that they look like a single composition rather than ten separate decisions is a different job, and it is where most gallery walls go wrong.
The failures are consistent and predictable. Frames hung too high, because standing at the wall makes eye level feel higher than it is. Spacing that drifts, so the gaps on the left are wider than the gaps on the right. An arrangement that floats unanchored above a sofa. And a wall with eleven holes in it for a ten-frame set.
None of that is a skill problem. It is a sequence problem. Do the steps in the right order with the right measurements and a gallery wall is genuinely straightforward, even a large asymmetric one. This guide covers that sequence.

What you will need
Nothing exotic, but having it all to hand before you start matters, because stopping halfway to find a pencil is how measurements get lost.
- Tape measure. A steel one, not a tailor’s tape.
- Spirit level. A 30 cm level is adequate; a phone app is not, because the phone body is rarely flat against the frame.
- Pencil and a soft eraser.
- Newspaper or kraft paper and masking tape, for templates.
- Drill with a masonry bit, plus wall plugs and screws. For concrete walls you want a hammer drill setting.
- Painter’s masking tape, which lifts off paint without pulling it.
- A second person, for anything above about eight frames. Not essential, but it halves the time.
Step 1: Measure the usable wall, not the wall
The wall is not the space you have. The usable wall is the space that is genuinely clear and at the right height.
Walk up to the wall and look for what eats into it: a light switch, an air-conditioning unit, a curtain rail bracket, the swing of a door, the back of a tall bookshelf, a ceiling fan’s reach. Then measure between those obstructions rather than corner to corner.
Take two numbers in centimetres: usable width, and usable height from the top of whatever furniture sits below up to about 20 cm short of the ceiling. If you are choosing a frame set, the wall planner on the frame bundles page takes exactly these two figures and returns layouts that fit, which saves working it out by hand.
Write both numbers down. You will use them repeatedly and you will misremember them if you do not.
Step 2: Get the centre height right
This is the single most important number in the whole job, and almost everyone gets it wrong in the same direction: too high.
The rule is that the centre of the arrangement sits at roughly 145 to 150 cm from the floor. That is standing eye level for most adults and it is the convention galleries use. Not the centre of the top row. Not the top edge. The vertical midpoint of the entire group.
The reason people hang too high is simple: while you are standing at the wall with a frame in your hands, your arms naturally hold it at chest height or above, and that feels correct. Then you sit down on the sofa and it is floating near the ceiling.
Two adjustments to the 145 cm baseline:
- Above furniture, the bottom edge of the lowest frame should be 20 to 25 cm above the furniture top. Closer than 15 cm and the arrangement looks like it is resting on the sofa; more than 30 cm and it detaches and floats.
- In a room where people are mostly seated, such as a dining room or a TV lounge, drop the centre to around 135 to 140 cm. Seated eye level is lower than standing.
When the two rules conflict above a sofa, follow the furniture rule. Visual connection to the furniture matters more than the absolute height.
Step 3: Choose your spacing and commit to it
The gap between frames does more to determine whether a gallery wall looks professional than the frames themselves.
Standard spacing is 5 to 8 cm between frame edges. Within that range:
- 5 cm reads as tight and contemporary, and makes a group of frames behave like one large object. Best for uniform grids and for smaller frames.
- 8 cm gives each frame room to breathe and suits larger frames and mixed-size layouts.
- Above 10 cm the arrangement stops reading as a group and becomes separate pictures that happen to be near each other.
The critical rule is consistency. Pick one number and use it everywhere, horizontally and vertically. Inconsistent gaps are the thing the eye notices immediately even when it cannot say why the wall looks wrong.
For mixed-size layouts, the spacing is measured between frame edges, not between centres. Measuring centre to centre with different frame sizes produces visibly uneven gaps, and this is the most common arithmetic error in the whole process.
Step 4: Build a paper template
Do not skip this. It takes twenty minutes and it is the difference between a clean job and a wall full of trial holes.
Cut a rectangle of newspaper or kraft paper for every frame, at the exact outer dimensions of that frame. Write the frame size on each one.
Then:
- Lay the full arrangement out on the floor first, using your chosen spacing. The floor is faster to adjust than a wall. Step back and look at it from a distance.
- Tape the paper rectangles to the wall with masking tape, in the layout you settled on.
- Live with it for an hour, or a day if you can. Walk past it, sit down in the room, look at it from the doorway. Paper on a wall reveals scale problems that a floor layout hides completely.
- Adjust freely. This is the only stage where changing your mind is free.
- Mark the hook position on each paper before you remove anything. Measure down from the top edge of the frame to where the hanging hook or wire sits, and transfer that measurement onto the paper with a cross.
That last step is the one that makes templates genuinely useful rather than just decorative. You drill through or at the cross while the paper is still taped up, which means every fixing lands in the right place without you measuring anything twice.
Many frame bundles come with a layout template or diagram. If yours does, use it alongside the paper method rather than instead of it, because the supplied template tells you the arrangement but the paper tells you how it looks in your specific room.
Step 5: Fixings for Indian walls
This is where guides written for other markets stop being useful. Most Indian homes have concrete or solid brick walls, not timber-stud plasterboard, and the fixing advice is completely different.
Concrete and RCC walls
You need a hammer drill or a drill with a hammer setting, and a masonry bit. Drill the hole, insert a plastic wall plug, then drive the screw into the plug. A screw straight into concrete will not hold, and a plug without a correctly sized hole will spin uselessly.
Match the bit to the plug, not to the screw. A 6 mm plug needs a 6 mm hole.
Brick walls
Same approach, but aim for the brick rather than the mortar line where you can. Mortar crumbles and the fixing loosens over time. If you hit mortar and the drill suddenly goes in easily, move 3 cm along and try again.
Adhesive hooks
Tempting, and fine for very light frames on smooth painted surfaces. Two warnings. They fail in heat and humidity, which covers most of India for most of the year. And framed prints with glass are heavier than people estimate, so a ten-frame gallery wall on adhesive hooks is a slow-motion accident.
If you are renting and cannot drill, use adhesive hooks rated well above the actual frame weight, stay with smaller frames, and check them monthly.
Before you drill anywhere
Avoid drilling directly above or below a switch or socket, where cables run vertically. Avoid the area around a bathroom or kitchen wall where pipes may be buried. If you are unsure what is behind a wall, move the arrangement rather than taking the chance.
Step 6: Hang from the centre outward
Order matters. Start with the centre frame, or the largest frame in a centrepiece layout, and work outward in both directions.
Starting from one end and working across accumulates error. Every small deviation compounds, so by the tenth frame you are several centimetres out and the only fix is taking everything down. Working outward from the centre splits any error in half and distributes it to the edges, where it is far less visible.
Check each frame with the spirit level as you hang it, not at the end. And check the frame itself is level, not the hook, because a frame hanging on a wire can sit crooked on a perfectly level fixing.
Handling specific layout types
Uniform grids
The easiest to hang and the least forgiving of error, which sounds contradictory but is not. Every gap is identical, so a 1 cm mistake is instantly visible against its neighbours.
Work out your total dimensions before drilling. For a 3 × 3 grid of 10×10 inch frames at 6 cm spacing: three frames at 25.4 cm each is 76.2 cm, plus two gaps of 6 cm is 12 cm, giving 88.2 cm square overall. Knowing that number tells you where the outer edges land and lets you centre the whole block properly.
Centrepiece layouts
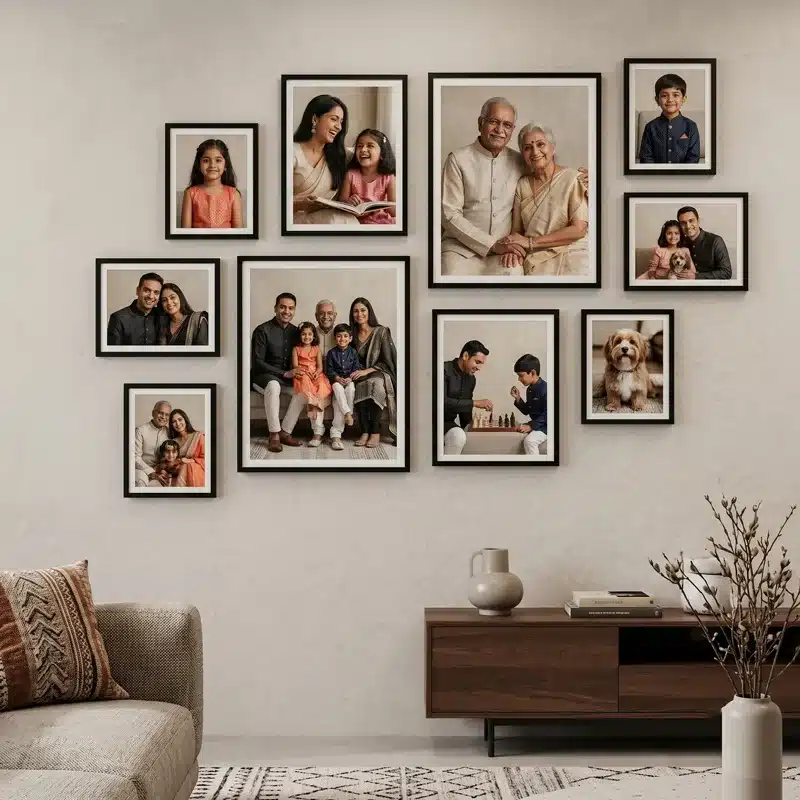
Hang the large frame first and get it exactly where you want it, because everything else references it. Keep the spacing from the centrepiece to its neighbours the same as the spacing between the smaller frames; a wider gap around the large frame isolates it from the group.
Asymmetric clusters
The paper template is not optional here. With no repeating measurement, there is nothing to check your work against, and improvising with mixed frame sizes almost always produces an arrangement that looks unbalanced rather than deliberately irregular.
One technique that helps: keep the outer boundary of the cluster roughly rectangular even though the frames inside are irregular. Asymmetric arrangements that also have a ragged outline read as messy; ones contained within an implied rectangle read as designed.
Horizontal rows
Measure a single horizontal line in pencil across the wall first, checked with the level, and hang everything to it. For a row, all frames share one centre line, so getting that line right does most of the work.
Staircase layouts

The hardest case, because there is no horizontal reference. The frames step diagonally, following the stair, but each individual frame must still hang level.
Method: measure the same vertical distance up from each stair nosing to establish your centre points. That gives you a diagonal line parallel to the stair rise. Each frame centre sits on that diagonal, and each frame itself is levelled horizontally. Do not try to eyeball the diagonal; measure from the stairs every time.
Also consider head clearance. A frame that projects into the walking line on a stairwell is a hazard, so keep arrangements on the wall side rather than near the open edge.
Mistakes that cost you a repaint
- Hanging too high. The most common error by a wide margin. Centre at 145 cm, or lower above furniture.
- Measuring centre to centre with mixed frame sizes. Always measure edge to edge.
- Starting at one end. Error accumulates. Start at the centre.
- Skipping the paper template. Twenty minutes of paper versus an afternoon of filler and touch-up paint.
- Drilling before checking for cables. Avoid the vertical runs above and below switches and sockets.
- Trusting adhesive hooks with glass frames. Heat, humidity and weight are not a good combination.
- Going wider than the furniture below. Two-thirds to three-quarters of the furniture width is the target.
- Not stepping back. Look from the doorway and from a seated position before you commit, not after.
After it is up
A few things worth doing once the wall is finished.
Erase your pencil marks while you remember where they are.
Check direct sunlight. A wall that gets hours of direct sun will fade prints over years regardless of ink quality, and glass will also throw glare that makes photographs hard to see at certain times of day. If the wall gets strong afternoon sun, that is worth knowing before you fill it.
Clean glass with a damp microfibre cloth, not a spray applied directly to the frame. Liquid running down behind glass and reaching the print is a slow problem that shows up months later.
Re-check fixings after a few weeks, particularly in a humid climate and particularly for anything heavy.
Frequently asked questions
How high should a gallery wall be hung?
The centre of the whole arrangement at about 145 to 150 cm from the floor. Above furniture, position it so the lowest frame’s bottom edge is 20 to 25 cm above the furniture top instead.
How much space should be between frames?
5 to 8 cm between frame edges. Use 5 cm for tight contemporary grids and smaller frames, 8 cm for larger or mixed-size sets. Keep the gap identical throughout, measured edge to edge.
Do I need a drill for a concrete wall?
Yes, with a hammer setting and a masonry bit, plus wall plugs sized to match your drill bit. Screws driven straight into concrete will not hold framed prints with glass.
Can I hang a gallery wall without making holes?
Only for light frames on smooth painted walls, using adhesive hooks rated above the actual weight. Adhesive fixings lose grip in heat and humidity, so they are a poor choice for heavier framed sets or for Indian summers.
How wide should the arrangement be above a sofa?
About two-thirds to three-quarters of the sofa width. Wider than the sofa looks like overflow; much narrower looks stranded.
What is the easiest layout for a first attempt?
A horizontal row, because every frame shares one centre line. After that, a uniform grid. Save asymmetric clusters for when you have hung something successfully once.
In short
Measure the usable wall rather than the wall. Put the centre of the arrangement at 145 cm, or 20 to 25 cm above furniture. Pick one spacing between 5 and 8 cm and use it everywhere, measured edge to edge. Build paper templates and live with them for a day. Use plugs in concrete. Hang from the centre outward.
Those six things account for almost every difference between a gallery wall that looks intentional and one that looks improvised.
If you are still choosing a set, the photo frame bundles page has 35 pre-planned layouts and a wall planner that works from your measured dimensions, and our guide to choosing the right frame bundle for your wall compares them by room and frame count. For individual frames rather than sets, see how to choose and display photo frames.